
Building Kafka Producer and Consumer Microservices with Spring Boot on Kubernetes Using GitHub Actions
Apr 5, 2024 in Cloud Optimization Strategies by Admirise Team
Nowadays the need for scalable and resilient microservices architecture has become paramount. In recent years Apache Kafka, a distributed event streaming platform, has gained popularity for its ability to handle large volumes of real-time data efficiently. In this article, we will explore the process of building Kafka Producer and Consumer microservices for a real use-case using the Spring Boot Framework and deploying them on Kubernetes with the help of GitHub Actions for automated CI/CD.
To depict a practical application scenario, it has been chosen to create a scalable yet straightforward web page link extractor (producer) and web page downloader (consumer), by leveraging the Kafka Producer and Consumer architecture.
- Prerequisites
- Setting Up Spring Boot Kafka Producer Microservice
- Key Components:
- Step 1: Initialize Spring Boot Project
- Step 2: Implement Kafka Producer (LinkProducer)
- Step 3: Dockerize the Kafka Producer
- Step 4: Create Kubernetes deployment, service and ingress resources.
- Step 5: Create GitHub Actions Workflow
- Setting Up Kafka Consumer Microservice
- Key Components:
- Step 1: Initialize Spring Boot Project
- Step 2: Implement Kafka Consumer
- Step 3: Dockerize the Consumer
- Step 4: Create Kubernetes deployment.
- Step 5: Create GitHub Actions Workflow
Prerequisites
- JDK is installed on your development machine.
- Gradle for building Spring Boot applications.
- Docker for containerization.
- A Kubernetes cluster, locally or on a cloud provider.
- A running instance of Apache Kafka on either a Kubernetes cluster or a local machine.
- A GitHub repository for version control and CI/CD using GitHub Actions.
Explore the straightforward guide on How to Easily Deploy Apache Kafka on Kubernetes or Locally.
Setting Up Spring Boot Kafka Producer Microservice
The purpose of the Kafka Producer microservice is to demonstrate a microservice architecture built with Spring Boot, showcasing the integration of Apache Kafka for message-driven communication.
This app focuses on a specific microservice responsible for extracting hyperlinks from web pages, producing these links to a Kafka topic named “LINKS”, and providing REST endpoints for fetching and producing links.
Key Components:
Link (Record):
- Represents a hyperlink with textual content and an associated URL.
- Provides a method for concatenating the link with a base URL.
LinkExtractor:
- Downloads web pages and extracts hyperlinks using Jsoup for HTML parsing.
- Provides methods for downloading pages, extracting links, and concatenating links with a base URL.
LinkProducer:
- Handles the production of Link messages to the “LINKS” Kafka topic.
- Configures the Kafka topic during bean initialization.
- Sends link messages to different partitions based on a predefined partition count.
LinkRestController:
- Exposes REST endpoints for fetching and producing links.
- Allows clients to request links from a specified URL or produce links to the Kafka topic.
- Utilizes the LinkExtractor and LinkProducer for link-related operations.
LinkProducerApplication:
- The main Spring Boot application class is responsible for launching the microservice.
- Configures KafkaAdmin for interacting with Kafka during application startup.
Step 1: Initialize Spring Boot Project
As illustrated below, use Spring Initializer or your preferred IDE to create a new Spring Boot project with Spring Boot Starter Web, Kafka, and Jsoup dependencies.
# build.gradle
dependencies {
  implementation 'org.springframework.boot:spring-boot-starter-web'
  implementation 'org.springframework.kafka:spring-kafka'
  implementation 'org.jsoup:jsoup:1.16.1'
}
Step 2: Implement Kafka Producer (LinkProducer)
Create application.properties as follows:
# src/main/resources/application.properties
spring.kafka.bootstrap-servers=localhost:9092
#spring.kafka.properties.security.protocol=SASL_PLAINTEXT
#spring.kafka.properties.sasl.mechanism=PLAIN
#spring.kafka.properties.sasl.jaas.config=org.apache.kafka.common.security.plain.PlainLoginModule required username="user1" password="******";
spring.kafka.producer.value-serializer=org.springframework.kafka.support.serializer.JsonSerializer
spring.kafka.producer.properties.spring.json.type.mapping=link:com.example.kafkaapp.link.Link
To send a Kafka Message as a concrete type, JsonSerializer and the type mapping of Link class are specified in the properties file. Some properties are currently commented out; in the next sections, they will be uncommented.
Create Link, LinkExtractor, LinkProducer, LinkRestController and LinkProducerApplication classes
The Link record represents a hyperlink with textual content (text) and an associated URL (href). Also it includes a method concatenateWith to concatenate the current link with a base URL.
package com.example.kafkaapp.link;

import org.jsoup.Jsoup;
import org.springframework.web.client.RestClient;

import java.util.Optional;
import java.util.stream.Stream;

public class LinkExtractor {

    public String downloadPage(String url) {
        return RestClient.create()
                .get()
                .uri(url)
                .retrieve()
                .body(String.class);
    }

    private Stream<Link> extractLinks(String htmlContent) {
        return Jsoup.parse(Optional.ofNullable(htmlContent).orElse("<body></body>")).body()
                .selectXpath("//a[string-length(@href) > 0]")
                .stream()
                .map(element -> new Link(element.text(), element.attr("href")));
    }

    public Stream<Link> extractLinksOf(String url) {
        return extractLinks(downloadPage(url)).map(link -> link.concatenateWith(url));
    }

}- The
LinkExtractorclass is responsible for downloading web pages and extracting hyperlinks from the HTML content. - It utilizes the
RestClientto download the page andJsoupfor HTML parsing. - The
extractLinksOfmethod extracts and returns hyperlinks, applying theconcatenateWithmethod to ensure URLs are complete.
package com.example.kafkaapp.link;

import org.apache.kafka.clients.admin.NewTopic;
import org.springframework.beans.factory.annotation.Autowired;
import org.springframework.kafka.core.KafkaAdmin;
import org.springframework.kafka.core.KafkaTemplate;
import org.springframework.stereotype.Component;
import java.util.List;
import java.util.stream.IntStream;

@Component
public class LinkProducer {

    private final static int PARTITION_COUNT = 8;
    private final static String TOPIC = "LINKS";
    private final static short REPLICATION_FACTOR = 1;
    private final KafkaTemplate<String, Link> kafkaTemplate;

    public LinkProducer(KafkaTemplate<String, Link> kafkaTemplate) {
        this.kafkaTemplate = kafkaTemplate;
    }

    @Autowired
    public void configureTopic(KafkaAdmin kafkaAdmin) {
        kafkaAdmin.createOrModifyTopics(new NewTopic(TOPIC, PARTITION_COUNT, REPLICATION_FACTOR));
    }

    public void sendLinkMessages(List<Link> links) {
        IntStream.range(0, links.size())
                .forEach(index -> sendLinkMessage(index, links.get(index)));
    }

    private void sendLinkMessage(int index, Link link) {
        kafkaTemplate.send(TOPIC, index % PARTITION_COUNT, "key", link);
    }
}- The
LinkProducerclass handles the production ofLinkmessages to a Kafka topic named “LINKS”. - It configures the topic using the
configureTopicmethod during bean initialization. - The
sendLinkMessagesmethod sends each link as a message to the Kafka topic.
Please note that a topic has been created with eight partitions. This implies that you should deploy a maximum of eight Kafka consumer instances to fetch messages from this topic. Adding more consumers than the number of partitions in a topic is unnecessary, as some of the consumers will remain idle. The choice of partition and consumer counts should align with your specific use case.
package com.example.kafkaapp.link;

import org.springframework.web.bind.annotation.GetMapping;
import org.springframework.web.bind.annotation.RequestParam;
import org.springframework.web.bind.annotation.RestController;

import java.util.AbstractMap;
import java.util.List;
import java.util.Map;
import java.util.Optional;
import java.util.stream.Stream;

@RestController
public class LinkRestController {

    private final LinkExtractor linkExtractor = new LinkExtractor();
    private final LinkProducer linkProducer;

    public LinkRestController(LinkProducer linkProducer) {
        this.linkProducer = linkProducer;
    }

    @GetMapping("/fetch")
    public Stream<Link> extractLinksOf(@RequestParam String url) {
        return linkExtractor.extractLinksOf(url);
    }

    @GetMapping("/produce")
    public Map.Entry<String, Integer> produceLinksOf(@RequestParam String url) {
        List<Link> links = linkExtractor.extractLinksOf(url).toList();
        linkProducer.sendLinkMessages(links);
        return new AbstractMap.SimpleEntry<>("Produced Link Count", links.size());
    }
}- The
LinkRestControllerclass exposes two REST endpoints for fetching and producing links. - The
extractLinksOfmethod returns a stream of hyperlinks extracted from the specified URL. - The
produceLinksOfmethod extracts links from a URL, sends them to the Kafka topic usingLinkProducer, and returns the produced link count.
package com.example.kafkaapp;

import org.apache.kafka.clients.admin.AdminClientConfig;
import org.springframework.beans.factory.annotation.Value;
import org.springframework.boot.SpringApplication;
import org.springframework.boot.autoconfigure.SpringBootApplication;
import org.springframework.context.annotation.Bean;
import org.springframework.kafka.core.KafkaAdmin;

import java.util.HashMap;
import java.util.Map;

@SpringBootApplication
public class LinkProducerApplication {

    @Bean
    public KafkaAdmin admin(@Value("${spring.kafka.bootstrap-servers}") String kafkaBrokers) {
        Map<String, Object> configs = new HashMap<>();
        configs.put(AdminClientConfig.BOOTSTRAP_SERVERS_CONFIG, kafkaBrokers);
        return new KafkaAdmin(configs);
    }

    public static void main(String[] args) {
        SpringApplication.run(LinkProducerApplication.class, args);
    }

}- The
LinkProducerApplicationclass is the main Spring Boot application class. - It includes a bean for configuring KafkaAdmin to interact with Kafka during application startup.
- The
mainmethod launches the Spring Boot application.
After creating the classes and resources, you can run the following command to verify if the Kafka Producer microservice is operational:
./gradlew bootRunOpen your preferred web browser and go to http://localhost:8080/fetch?url=https://spring.io/. If you observe the fetched links in JSON format, your Docker container is running smoothly. You may also visit the http://localhost/produce?url=https://spring.io endpoint to extract information from the specified URL and dispatch it as Kafka messages to a topic named “LINKS”. It’s important to note that, as of now, no Kafka Consumer has been implemented. Although the messages are sent successfully, they will not be consumed by any Kafka consumer at this point.
Upto this stage, we’ve crafted a web page LinkExtractor capable of extracting links from a given web page. Additionally, we've developed a LinkProducer responsible for sending Kafka messages containing the extracted links to a Kafka topic named "LINKS". Furthermore, we've created a LinkRestController with two endpoints:
- fetch?url={url}: This endpoint allows us to retrieve links from a specified URL.
- produce?url={url}: By using this endpoint, we can not only fetch and extract links from a given URL but also send these links as Kafka messages. These messages will be consumed by Kafka consumers for further processing.
Step 3: Dockerize the Kafka Producer
Create a Dockerfile to package the Kafka Producer as a Docker image
FROM openjdk:21-slim
WORKDIR /app
COPY build/libs/kafka-app-1.0.jar app.jar
EXPOSE 8080

ENTRYPOINT ["java", "-jar", "app.jar"]
As you might have noticed, we haven’t built the Kafka Producer microservice application through Gradle yet. Although we intentionally omitted the Gradle build since the build process will be executed by GitHub Actions workflow in the proceeding sections, you can still build the microservice on your local machine using the following Gradle command:
./gradlew assembleRun the following command in the project’s root folder to locally build the image:
docker build . -t kafka-producerOnce the image is successfully built, run the specified command to launch the Docker image.
docker run -it -p 8080:8080 kafka-producerUpon running the above command, you should observe logs similar to the following:
o.a.kafka.common.utils.AppInfoParser     : Kafka version: 3.6.1
o.a.kafka.common.utils.AppInfoParser     : Kafka commitId: 5e3c2b738d253ff5
o.a.kafka.common.utils.AppInfoParser     : Kafka startTimeMs: 1704654285113
o.a.kafka.common.utils.AppInfoParser     : App info kafka.admin.client for adminclient-1 unregistered
o.apache.kafka.common.metrics.Metrics    : Metrics scheduler closed
o.apache.kafka.common.metrics.Metrics    : Closing reporter org.apache.kafka.common.metrics.JmxReporter
o.apache.kafka.common.metrics.Metrics    : Metrics reporters closed
o.s.b.w.embedded.tomcat.TomcatWebServer  : Tomcat started on port 8080 (http) with context path ''
c.e.kafkaapp.LinkProducerApplication     : Started LinkProducerApplication in 1.099 seconds (process running for 1.363)
Step 4: Create Kubernetes deployment, service and ingress resources.
To run a Spring Boot Microservice application on a Kubernetes Cluster, it’s crucial to set up deployment, service, and ingress resources. Although the deployment.yaml file is sufficient for the Kubernetes Cluster to execute the application, the service and ingress resources need definition to enable communication between microservices across the cluster and expose the application externally. To streamline the process, all three resource files are consolidated into a single project.yaml file for ease and simplicity.,
# project.yaml
---
apiVersion: apps/v1
kind: Deployment
metadata:
  labels:
    app: kafka-app
  name: kafka-app
  namespace: default
spec:
  selector:
    matchLabels:
      app: kafka-app
  template:
    metadata:
      labels:
        app: kafka-app
      name: kafka-app
      namespace: default
    spec:
      containers:
        - image: ghcr.io/mustafaguc/kafka-app:latest
          imagePullPolicy: Always
          name: container-0
          ports:
            - containerPort: 8080
              name: http
              protocol: TCP
          resources: {}
      dnsPolicy: ClusterFirst
      imagePullSecrets:
        - name: my-docker-registry
      restartPolicy: Always

---
apiVersion: v1
kind: Service
metadata:
  name: kafka-app
  namespace: default
spec:
  ports:
    - name: http
      port: 80
      protocol: TCP
      targetPort: 8080
  selector:
    app: kafka-app
  sessionAffinity: None
  type: ClusterIP

---
apiVersion: networking.k8s.io/v1
kind: Ingress
metadata:
  name: kafka-app
  namespace: default
spec:
  ingressClassName: nginx
  rules:
    - host: kafka-app.example.com
      http:
        paths:
          - backend:
              service:
                name: kafka-app
                port:
                  name: http
            path: /
            pathType: Prefix
For a comprehensive explanation, please refer to here
Step 5: Create GitHub Actions Workflow
To build, push, and deploy a Gradle-based Java Spring Boot Microservice application to Kubernetes Cluster, the following GitHub Actions workflow can be used:
name: Java Gradle Build & Docker Push

on:
  push:
    branches: [ "main" ]
  pull_request:
    branches: [ "main" ]

env:
  # Use docker.io for Docker Hub if empty
  REGISTRY: ghcr.io
  # github.repository as <account>/<repo>
  IMAGE_NAME: ${{ github.repository }}

jobs:
  build:

    runs-on: ubuntu-latest
    permissions:
      contents: read
      packages: write
      # This is used to complete the identity challenge
      # with sigstore/fulcio when running outside of PRs.
      id-token: write

    steps:
      - uses: actions/checkout@v3
      - name: Set up JDK 21
        uses: actions/setup-java@v3
        with:
          java-version: '21'
          distribution: 'temurin'
      - name: Build with Gradle
        uses: gradle/gradle-build-action@bd5760595778326ba7f1441bcf7e88b49de61a25 # v2.6.0
        with:
          arguments: build

        # Install the cosign tool except on PR
        # https://github.com/sigstore/cosign-installer
      - name: Install cosign
        if: github.event_name != 'pull_request'
        uses: sigstore/cosign-installer@6e04d228eb30da1757ee4e1dd75a0ec73a653e06 #v3.1.1
        with:
          cosign-release: 'v2.1.1'

        # Set up BuildKit Docker container builder to be able to build
        # multi-platform images and export cache
        # https://github.com/docker/setup-buildx-action
      - name: Set up Docker Buildx
        uses: docker/setup-buildx-action@f95db51fddba0c2d1ec667646a06c2ce06100226 # v3.0.0

        # Login against a Docker registry except on PR
        # https://github.com/docker/login-action
      - name: Log into registry ${{ env.REGISTRY }}
        if: github.event_name != 'pull_request'
        uses: docker/login-action@343f7c4344506bcbf9b4de18042ae17996df046d # v3.0.0
        with:
          registry: ${{ env.REGISTRY }}
          username: ${{ github.actor }}
          password: ${{ secrets.GITHUB_TOKEN }}

        # Extract metadata (tags, labels) for Docker
        # https://github.com/docker/metadata-action
      - name: Extract Docker metadata
        id: meta
        uses: docker/metadata-action@96383f45573cb7f253c731d3b3ab81c87ef81934 # v5.0.0
        with:
          images: ${{ env.REGISTRY }}/${{ env.IMAGE_NAME }}

        # Build and push Docker image with Buildx (don't push on PR)
        # https://github.com/docker/build-push-action
      - name: Build and push Docker image
        id: build-and-push
        uses: docker/build-push-action@0565240e2d4ab88bba5387d719585280857ece09 # v5.0.0
        with:
          context: .
          push: ${{ github.event_name != 'pull_request' }}
          #tags: ${{ steps.meta.outputs.tags }}
          tags: |
            ${{ env.REGISTRY }}/${{ env.IMAGE_NAME }}:latest
            ${{ env.REGISTRY }}/${{ env.IMAGE_NAME }}:${{ github.sha }}
          labels: ${{ steps.meta.outputs.labels }}
          cache-from: type=gha
          cache-to: type=gha,mode=max


  deploy:
    name: Deploy
    needs: [ build ]
    runs-on: ubuntu-latest
    steps:
      - name: Set the Kubernetes context
        uses: azure/k8s-set-context@v3
        with:
          method: kubeconfig
          kubeconfig: ${{secrets.KUBECONFIG}}

      - name: Checkout source code
        uses: actions/checkout@v3

      - name: Deploy to the Kubernetes cluster
        uses: azure/k8s-deploy@v4
        with:
          skip-tls-verify: true
          manifests: |
            kubernetes/project.yaml
          images: |
            ${{ env.REGISTRY }}/${{ env.IMAGE_NAME }}:${{ github.sha }}
This workflow is designed for ease of use and adaptability, requiring minimal modification. The only essential customization is defining the KUBECONFIG values as a GitHub Actions Secret Repository, as outlined here. This ensures a secure and portable configuration for accessing the Kubernetes cluster.
To apply Kubernetes configuration and GitHub Actions workflows certain prerequisites must be done beforehand. These requirements are omitted for brevity, these are explained in detail here, please refer to it.
Setting Up Kafka Consumer Microservice
The Link Consumer Microservice is a Spring Boot-based project designed to consume messages from a Kafka topic named “LINKS.” The microservice is responsible for processing incoming messages of type Link, which is a record containing information about a hyperlink, including text and href (URL). The goal of the microservice is to download the web page associated with the received link and log relevant information.
Key Components:
Link:
- Represents a hyperlink with two attributes:
text(link text) andhref(URL).
LinkConsumer:
- Annotated with
@Component, this class serves as the Kafka message listener. - Listens to the “LINKS” topic with a group ID “LINK_CONSUMERS.”
- Upon receiving a
Linkmessage, initiates the downloadPage process.
LinkConsumerApplication:
- Annotated with
@SpringBootApplication, this class serves as the entry point for the Spring Boot application. - Uses
SpringApplication.runto start the microservice.
Step 1: Initialize Spring Boot Project
Use Spring Initializer or your preferred IDE to create a new Spring Boot project with Spring Web (not Spring Boot Web), Spring Kafka, and Jackson Databind dependencies as follows:
dependencies {
 implementation 'org.springframework.boot:spring-boot-starter'
 implementation 'org.springframework:spring-web:6.1.2'
 implementation 'org.springframework.kafka:spring-kafka'
 implementation 'com.fasterxml.jackson.core:jackson-databind:2.15.1'
}
Step 2: Implement Kafka Consumer
Create application.properties as follows:
spring.kafka.bootstrap-servers=localhost:9092
spring.kafka.consumer.value-deserializer=org.springframework.kafka.support.serializer.JsonDeserializer
spring.kafka.consumer.properties.spring.json.type.mapping=link:com.example.consumer.Link
#spring.kafka.properties.security.protocol=SASL_PLAINTEXT
#spring.kafka.properties.sasl.mechanism=PLAIN
#spring.kafka.properties.sasl.jaas.config=org.apache.kafka.common.security.plain.PlainLoginModule required username="user1" password="******";
To deserialize a Kafka Message as a concrete type, JsonDeserializer and the type mapping of the Link class are specified in the properties file. Some properties are currently commented out; in the next sections, they will be uncommented.
Create Link, LinkConsumer and LinkConsumerApplication classes
package com.example.consumer;

public record Link(String text, String href) {

}- Represents a hyperlink with two attributes:
text(link text) andhref(URL). - A record class, providing an immutable and concise way to encapsulate link information.
package com.example.consumer;

import org.slf4j.Logger;
import org.slf4j.LoggerFactory;
import org.springframework.http.ResponseEntity;
import org.springframework.http.client.SimpleClientHttpRequestFactory;
import org.springframework.kafka.annotation.KafkaListener;
import org.springframework.stereotype.Component;
import org.springframework.web.client.RestClient;
import org.springframework.web.client.RestTemplate;

import java.net.HttpURLConnection;
import java.util.Optional;

@Component
public class LinkConsumer {

    private final Logger logger = LoggerFactory.getLogger(LinkConsumer.class.getName());

    private static final String TOPIC = "LINKS";
    private final RestClient restClient = createRestClient();

    @KafkaListener(topics = TOPIC, groupId = "LINK_CONSUMERS")
    public void consumeMessage(Link message) {
        logger.info("Received Link {}}", message.href());
        downloadPage(message);
    }

    private void downloadPage(Link message) {
        try {
            ResponseEntity<String> response = restClient
                    .get()
                    .uri(message.href().trim())
                    .retrieve()
                    .toEntity(String.class);

            String body = Optional.ofNullable(response.getBody()).orElse("BODY IS NULL");
            if (response.getStatusCode().is2xxSuccessful()) {
                logger.info("Request is successful, Brief Content : {}", body.substring(0, 255));
            } else {
                logger.warn("Request isn't successful :{}", response.getStatusCode());
            }
        } catch (Exception e) {
            logger.error(e.getMessage());
        }
    }

    private static RestClient createRestClient() {
        return RestClient.create(new RestTemplate(simpleClientHttpRequestFactory()));
    }

    private static SimpleClientHttpRequestFactory simpleClientHttpRequestFactory() {
        return new SimpleClientHttpRequestFactory() {
            @Override
            protected void prepareConnection(HttpURLConnection connection, String httpMethod) {
                connection.setInstanceFollowRedirects(true);
            }
        };
    }
}
The LinkConsumer class is a pivotal component within the Spring Boot project, designed to consume messages from a Kafka topic named "LINKS." Annotated with @Component, it serves as a Spring-managed bean. The class incorporates a Kafka message listener method (consumeMessage), which processes incoming messages of type Link - a record encapsulating hyperlink information.
Upon receiving a Link message, the LinkConsumer initiates the downloadPage process. This method utilizes a dedicated RestClient to perform HTTP GET requests for downloading web pages.
package com.example.consumer;

import org.springframework.boot.SpringApplication;
import org.springframework.boot.autoconfigure.SpringBootApplication;

@SpringBootApplication
public class LinkConsumerApplication {

 public static void main(String[] args) {
  SpringApplication.run(LinkConsumerApplication.class, args);
 }

}
This class serves as the entry point for the Spring Boot application.
After creating the classes and resources, if your local Kafka is running, you can run the following command to verify whether the Kafka Consumer microservice is operational:
plaintext
./gradlew bootRunIf you observe logs like the ones below, then your Kafka Consumer microservice is operational.
o.a.kafka.common.utils.AppInfoParser     : Kafka version: 3.6.1
o.a.kafka.common.utils.AppInfoParser     : Kafka commitId: 5e3c2b738d253ff5
o.a.kafka.common.utils.AppInfoParser     : Kafka startTimeMs: 1704665098343
fkaConsumerFactory$ExtendedKafkaConsumer : [Consumer clientId=consumer-LINK_CONSUMERS-1, groupId=LINK_CONSUMERS] Subscribed to topic(s): LINKS
c.e.consumer.LinkConsumerApplication     : Started LinkConsumerApplication in 0.49 seconds (process running for 5.808)
org.apache.kafka.clients.Metadata        : [Consumer clientId=consumer-LINK_CONSUMERS-1, groupId=LINK_CONSUMERS] Cluster ID: AhaI_OiPRzW-WzNa1YMbyw
o.a.k.c.c.internals.ConsumerCoordinator  : [Consumer clientId=consumer-LINK_CONSUMERS-1, groupId=LINK_CONSUMERS] Discovered group coordinator localhost:9092 (id: 2147483647 rack: null)
o.a.k.c.c.internals.ConsumerCoordinator  : [Consumer clientId=consumer-LINK_CONSUMERS-1, groupId=LINK_CONSUMERS] (Re-)joining group
o.s.k.l.KafkaMessageListenerContainer    : LINK_CONSUMERS: partitions assigned: [LINKS-0, LINKS-1, LINKS-2, LINKS-3, LINKS-4, LINKS-5, LINKS-6, LINKS-7]
We need to mention the assigned partitions here. Since only one instance of KafkaConsumer is running, you can observe that all eight partitions of the topic ‘LINKS’ have been assigned to this single instance. To distribute partitions or workload, additional instances of LinkConsumerApplication may be launched. Additional instances can be commenced on different terminal windows by executing the following:When more instances are initialized, partitions are distributed among them, as shown below:
./gradlew bootRunWhen more instances are initialized, partitions are distributed among them, as shown below:
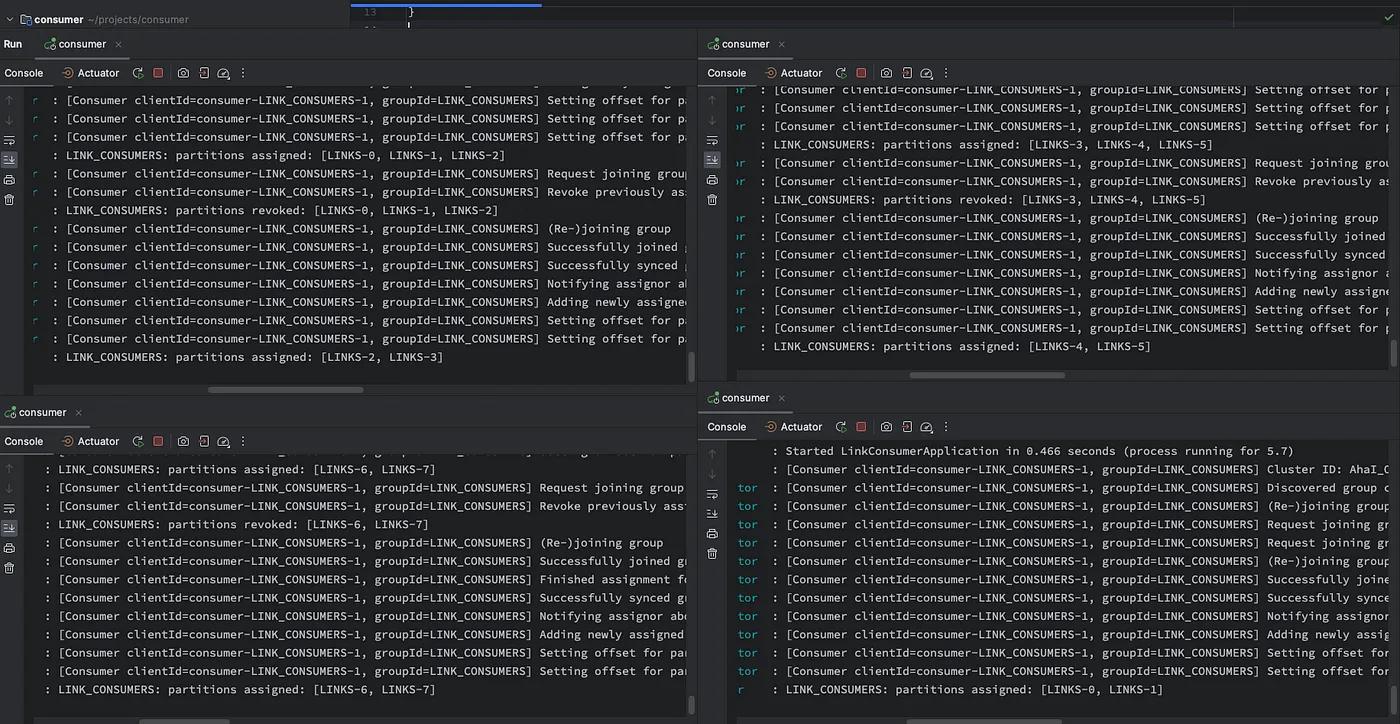
Four instances of LinkConsumerApplication have been initialized and two different partitions of the ”LINKS” topic have been assigned to each consumer. Since there is no point in having more consumers than partitions, the consumer count should not exceed the number of partitions.
Step 3: Dockerize the Consumer
Create a Dockerfile to package the Kafka Consumer as a Docker image
FROM openjdk:21-slim
WORKDIR /app
COPY build/libs/consumer-1.0.jar app.jar

ENTRYPOINT ["java", "-jar", "app.jar"]
Execute the following command to build docker image:
docker build . -t kafka-consumerOnce it’s been built successfully you can run instances of it as follows:
docker run -d kafka-consumerThis command runs the container in the background. You can call this command multiple times. As you launch more containers you see in the logs that partitions are distributed among these containers.
Step 4: Create Kubernetes deployment.
# project.yaml
---
apiVersion: apps/v1
kind: Deployment
metadata:
  labels:
    app: kafka-consumer
  name: kafka-consumer
  namespace: default
spec:
  replicas: 4
  selector:
    matchLabels:
      app: kafka-consumer
  template:
    metadata:
      labels:
        app: kafka-consumer
      name: kafka-consumer
      namespace: default
    spec:
      containers:
        - image: ghcr.io/mustafaguc/kafka-consumer:latest
          imagePullPolicy: Always
          name: container-0
          resources: {}
      dnsPolicy: ClusterFirst
      imagePullSecrets:
        - name: my-docker-registry
      restartPolicy: Always
Since the LinkConsumer microservice is solely a listener application, there is no need to create any service or ingress resource at the moment.
Step 5: Create GitHub Actions Workflow
This step is the same as Step 5 of the Kafka Producer microservice, please refer to it.
....
As a final step, it is essential to review the application.properties files for both the LinkProducer (Kafka Producer) and LinkConsumer (Kafka Consumer) microservices.
Here are the common properties for both projects:
spring.kafka.bootstrap-servers=localhost:9092
spring.kafka.properties.security.protocol=SASL_PLAINTEXT
spring.kafka.properties.sasl.mechanism=PLAIN
spring.kafka.properties.sasl.jaas.config=org.apache.kafka.common.security.plain.PlainLoginModule required username="user1" password="******";
Before the production deployment of the projects, we need to change the properties above as follows:
spring.kafka.bootstrap-servers=kafka:9092Update the bootstrap server value to match your actual production Kafka deployment. For Kubernetes cluster deployment, this value should be the name of the Kafka Service specified during Bitnami Helm Kafka installation. Refer to this link for a detailed explanation.
spring.kafka.properties.security.protocol=SASL_PLAINTEXT
spring.kafka.properties.sasl.mechanism=PLAIN
spring.kafka.properties.sasl.jaas.config=org.apache.kafka.common.security.plain.PlainLoginModule required username="user1" password="******";
If Kafka is deployed using the Bitnami Kafka Helm chart, you may retain the above values. The default sasl.client.users value is ‘user1’, and the sasl.client.passwordscan be obtained from the relevant Kubernetes secret values. Detailed information can be found here. Once you have obtained the username and password, you only need to adjust the spring.kafka.properties.sasl.jaas.config.property accordingly.
.....
In this article, we’ve explored the process of building Kafka Producer and Consumer microservices using Spring Boot, containerizing them with Docker, and deploying them on Kubernetes. Additionally, we implemented a CI/CD pipeline using GitHub Actions, ensuring a streamlined development and deployment workflow. By following these steps, you can enhance the scalability and maintainability of your microservices architecture while leveraging the power of Apache Kafka for real-time event streaming.
The configurations and source code can be accessed under the kafka-app and kafka-consumer GitHub repositories.
Thank you for reading and your patience. Wishing you a productive and enjoyable development process!


